Showing posts with label recipe. Show all posts

Monday, March 14, 2016

Chai Pi

Last year in honor of March 14th or Pi Day (remember Pi is 3.1415), I made several pies. In fact, I made so many pies I was too tired to blog about it. I made pecan, apple, lemon pudding and pumpkin pies. We also ate pizza (pie) for dinner. 


It was so fun I decided I HAD to make pie again this year for March 14th. This was also a great time to work on my new baking quest: making a dessert with just a little sugar on top. Fruit pies don't use that much added sugar anyways (except for lime or lemon) and after a year of making pies, I felt confident it was going to go well. I felt so confident that I looked at a few recipes and then made my own.

Except...the crust wasn't as pretty.

Last year my Pi decorated apple pie was super cute (see it close up below). I thought it was so cute, I made it the background on my Facebook page.


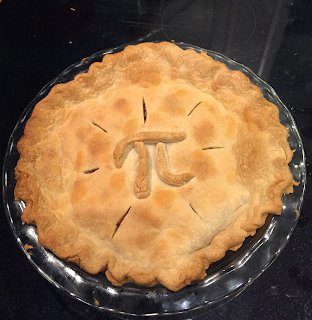
For some reason this year, the Pi symbol I tried to put on it moved around on me in the baking process and ceased looking like a Pi and more like the word Chai. 


Chai the Hebrew word for "life" and you pronounce it while bringing up phlegm from the back of your throat. That's why I named it the Chai Pi. 


Anyways, the Chai pie turned out fantastic! The crust was flakey. The filling wasn't too runny. You could tell that it was not as sweet as my regular apple pie, but it was delicious. Most importantly my husband with diabetes loved it!

I guess life does taste good! ;)

Now Bake That!

No really, heres' the recipe:


Betsy's Sugar On Top Apple Pie

Crust:
2/3 cup + 2 tbsp butter, diced and chilled
1/2 cup almond meal
1 1/2 cups of unbleached all-purpose flour
1 tsp kosher salt
6-7 tbsp ice cold water

Filling:
6-8 apples, peeled, cored and diced
1 1/2 tbsp cornstarch
1/4 tsp ground nutmeg
1 tsp cinnamon
3 tbsp orange juice

(optional) Topping:
1 tsp Turbinado sugar (a.k.a. Sugar in the Raw)

Method:
Dice up the butter and then put it on a covered plate in the freezer. Fill up a cup with ice water and let it chill. Measure the dry ingredients (almond meal, flour and salt) and pulse it in the food processor. Add the butter and pulse again until it's coarse crumbs. Measure your ice water. Then with the processor running, slowly add the ice water until the dough balls up on one of the sides of the processor.  Stop the processor right away. Take out the dough, flatten it into a disk. Handle the dough  as minimally as possible. Place the disk in the fridge for at least 30 minutes.

Meanwhile, preheat the oven at 400. Peel, dice and core the apples. Toss the apple pieces in the cornstarch and spices. Then toss the apples in the orange juice. Set aside.

Pull your dough disk out of the fridge and split in half.  Roll the dough and place the bottom crust in a pie pan. Fill the pie with the filling. Roll out the top crust and place on the top of the pie. Trim, fold and pinch the edges. Score the top of the pie. Using aluminum foil, make a crust shield and cover up the edges of your crust. Sprinkle top with turbinando sugar.

Place pie in the oven. Bake at 400 for 10 minutes, then reduce the temperature to 350 and bake 40 minutes. Pull off your crust shield and then bake another 5-7 minutes more. Let pie cool for an hour before serving. 


Sunday, January 10, 2016

New Year's Resolution take 4: Sugar on top!

I'm back!!! 

The reason I haven't been blogging is I started to feel very guilty that I was baking all these awesome desserts that my husband with Diabetes shouldn't be eating. I still baked, but it was mostly for holidays, potlucks or I brought the sweet stuff to work (much to the frustration of those dieting).

I toyed with making sugar-free desserts, but I had a big problem. I don't like fake sugar and it doesn't like me back. I find most alternative sweeteners to be disgusting/icky after taste, make my stomach hurt and/or they give me a migraine. 

So I'm taking the middle road. My New Year's baking resolution for 2016 is to make desserts that are (mostly) sweetened with fruit and to make it taste amazing, put a little of something sugary-sweet on the top!

I started my new journey with Banana Oat Bars. (click the link for the recipe) The recipe recommends some optional mix-ins. I choose to add ground walnuts to the batter for some protein (carbs+protein is a good plan for anyone with blood sugar issues) and my sugar-on-top ingredient was mini chocolate chips.

The recipe can easily be adjusted to be made paleo, kosher parve, vegan, gluten free and nut free. You could also skip my sugar-on-top option and be on the clean-eating wagon. Whatever works for you.

The reason to make these bars:
1. I could give them to my kids for breakfast -- guilt free!
2. They tasted like gooey banana bread. Nuff said.


Now Bake That!


Sunday, February 17, 2013

Choly Challah Batman!


When my kids were born, I started buying challah nearly every week. We would use it to celebrate Shabbat on Friday night and then eat amazing french toast or grilled cheese the next day. I normally bought the challah from a local bakery. I would reserve it ahead of time because they ran out so frequently. Then one day in 2007, I forgot to reserve one and arrived at the store too late. I went to a grocery store and they were out of it too. Then I tried for the local kosher bakery and they were closed! (They moved to a new location but of course didn't write it on the sign on the door). Arrgh!!

Clearly the universe was trying to tell me something.

I started to drive to another store. Then I had an idea at the red light (My husband likes to call these vehicular epiphanies). I said to myself, "Screw it!! I have a package of yeast at home. I'll just go make it." 

It was the best thing I ever did.

From then on, I made it several times a month. I swear our friends agree to come over for dinner on a Friday just to have some fresh out of the oven. I use it as currency for my neighbor who helps put our kids on the bus in the morning. My challah obsession is why I picked bread as my year long baking quest this year. It's the only bread I know how to make and I just had to push the envelope. So even though I am going to make a new recipe each month, I had to blog about my recent challah story because I did something I never thought I would do. 

I made 12 loaves. In one day.

Oy.

I made it for my bus-helping neighbor's daughter's wedding. I used my neighbor's double oven as well as the one I had at home. That meant I was walking back and forth with dough and bread on my street. I'm sure it looked weird.


They turned out pretty! They were even prettier at the wedding reception.


About baking supplies: You can do this receipe without fancy stuff. However, I have had my best results using some toys. Consider getting a kitchen scale, parchment paper, a square shaped pizza stone, King Arthur Bread Flour, a Kitchen Aid stand mixer, Pampered Chef adjustable measuring cup (for the honey), and a candy thermometer. If you are using a stand mixer, read the manufacturer's instructions to find out the setting and time for using the dough hook. My 6 qt Professional Kitchen Aid kneads on setting 2 for two minutes.


Recipe:

Betsy's Challah
*makes two small loaves
1/4c water between 105-110 degrees
1 tsp quick acting yeast
1 tsp granulated sugar
1/3 c vegetable oil
1/3 c honey
2 eggs
600g of bread flour (4 cups)
10g kosher salt (roughly 1 1/2 tsp)
1/2 c warm water
Additional flour for kneading
1 egg 
1 tsp water

Using a candy thermometer run the water in your sink until the it reaches between 105-110 degrees. Measure quarter of a cup of water and stir in yeast and sugar. Set aside and allow to get bubbly, about 5 minutes. While the yeast is waking up, work on the rest of the dough. Using a kitchen scale and a stand mixer with the dough hook attachment, measure and pour in oil, eggs, honey, flour and salt into the mixer bowl. When the yeast mixture is completed, start your mixer on the lowest setting. While its running, pour in the yeast mixture and then the other 1/2 cup of warm water. Turn the mixer up a level (mine is level 2 for kneading bread) and knead for 2 minutes (or what your mixer's instructions suggest). Turn the dough onto a floured surface and knead for about 1 minute. Place in a lightly oiled bowl and cover with plastic wrap and/or cover with a towel. Place in a warm area to rise for 1 1/2 hours (I put mine in the oven with a pan of hot water in it.) Punch down the dough and let rest for 10 more minutes. Turn the dough on a floured surface again and divide into 6 pieces. Braid three pieces at a time making two small loaves. Place on a parchment paper lined baking sheet and cover with plastic wrap. Either place in the fridge overnight or back into the warm place for 45 minutes. 

30 minutes before you are going to bake, place a small pan of water in the oven (I put it on the bottom rack). Place the pizza stone in the oven on the middle rack. Preheat the oven to 350 degrees. If you used the fridge to do the second rise, pull the baking sheet out of the fridge and place it on the counter while the oven preheats. Whisk together 1 egg and 1 tsp of water. Brush onto both loaves. Using the parchment paper, slide the dough onto the stone (you can bake it on the paper). Bake for 30-35 minutes. The loaves should be golden brown and sound hollow when you tap them.


Notes:
No stand mixer? Work on your arm muscles and knead the bread for 10 minutes.
No pizza stone? It's okay to bake it on a baking sheet. 
No parchment paper? Grease the pan with vegetable oil or use non-stick spray.
No King Arthur Flour? You can use unbleached all-purpose or a different brand of bread flour.
No adjustable measuring cup? Enjoy cleaning the honey stickiness!
Want to make dinner rolls instead of loaves? This recipe will make 18-20, 2 ounce rolls. Bake the rolls for 20-25 minutes at 350 degrees.

Now Bake That!


Monday, January 2, 2012

New Year's Resolution


Most people I know make New Year's resolutions to do things that they really, deep down, do not want to do. It's more like a to-do list your grandma would make for you. Sit up straight, go for a walk, eat your vegetables, wear a hat, and my favorite "If you eat the crusts off your bread, you'll get curly hair!". Yeah, my grandma lied. I still have stick straight hair. That's okay, I forgive her. She grew up during the Great Depression. Thrown away crusts would have been a crime. 

I didn't want a New Year's resolution that I didn't look forward to. I wanted something I was excited to do. Problem? I have a busy life. I work full time and have two busy school aged children. I needed a reason to carve a little "me" time.

My New Year's resolution: to bake pie. 

I love to bake. It's a hobby I have had since I was 8. I started with my mom making chocolate chip cookies. Since I still love to bake a myriad of other things, I chose to only bake a pie a month. So I went on the internet and figured out when different fruits are in season. Get some tips for that evil pie crust. My husband loves food magazines. I flipped through our pile and picked some winners. Here comes the first!

January: Lemon Icebox Pie from Saveur magazine

Recipe: http://www.saveur.com/article/Recipes/silver-skillet-lemon-icebox-pie


Comments:
The pie turned out great! I think starting with a cream pie was a very good idea. 
The recipe made a lot of filling so I had more than enough. When I pulled it out of my pie pan, the crust was hard for me to manage and some of it stuck on the bottom of the pan and it crumbled up. Clearly I am not a food stylist. It tasted great though.

Now Bake That!